Table of contents
Tutorial: Storage Setup
This short guide will help you through the essential steps to set up a storage unit for your studios and enable them to share their work together. Unlike the hub, which is unique, you will likely need several storage units.
Requirements
NAS
To create a storage unit, you will require a Network Attached Storage (NAS) per storage you wish to synchronise. These NAS must be running OpenSSH and Rsync.
Opening network ports
You will also need to setup a SSH service for each connected storage unit. This will allow them to receive and send the files they need. The SSH server can be configured to listen to any port of your choosing.
The Storages
Creating a new storage unit
The quickest way to create a storage unit is to go to the overview panel of your hub page and click on Add at the bottom of the page. This will generate a storage button. Click on it to create a new storage and automatically open its page.
Note
Keep in mind that you need a NAS running OpenSSH and Rsync per storage you wish to synchronise.
Note
A network port for SSH must be opened in your firewall for the storage to be able to transfer files

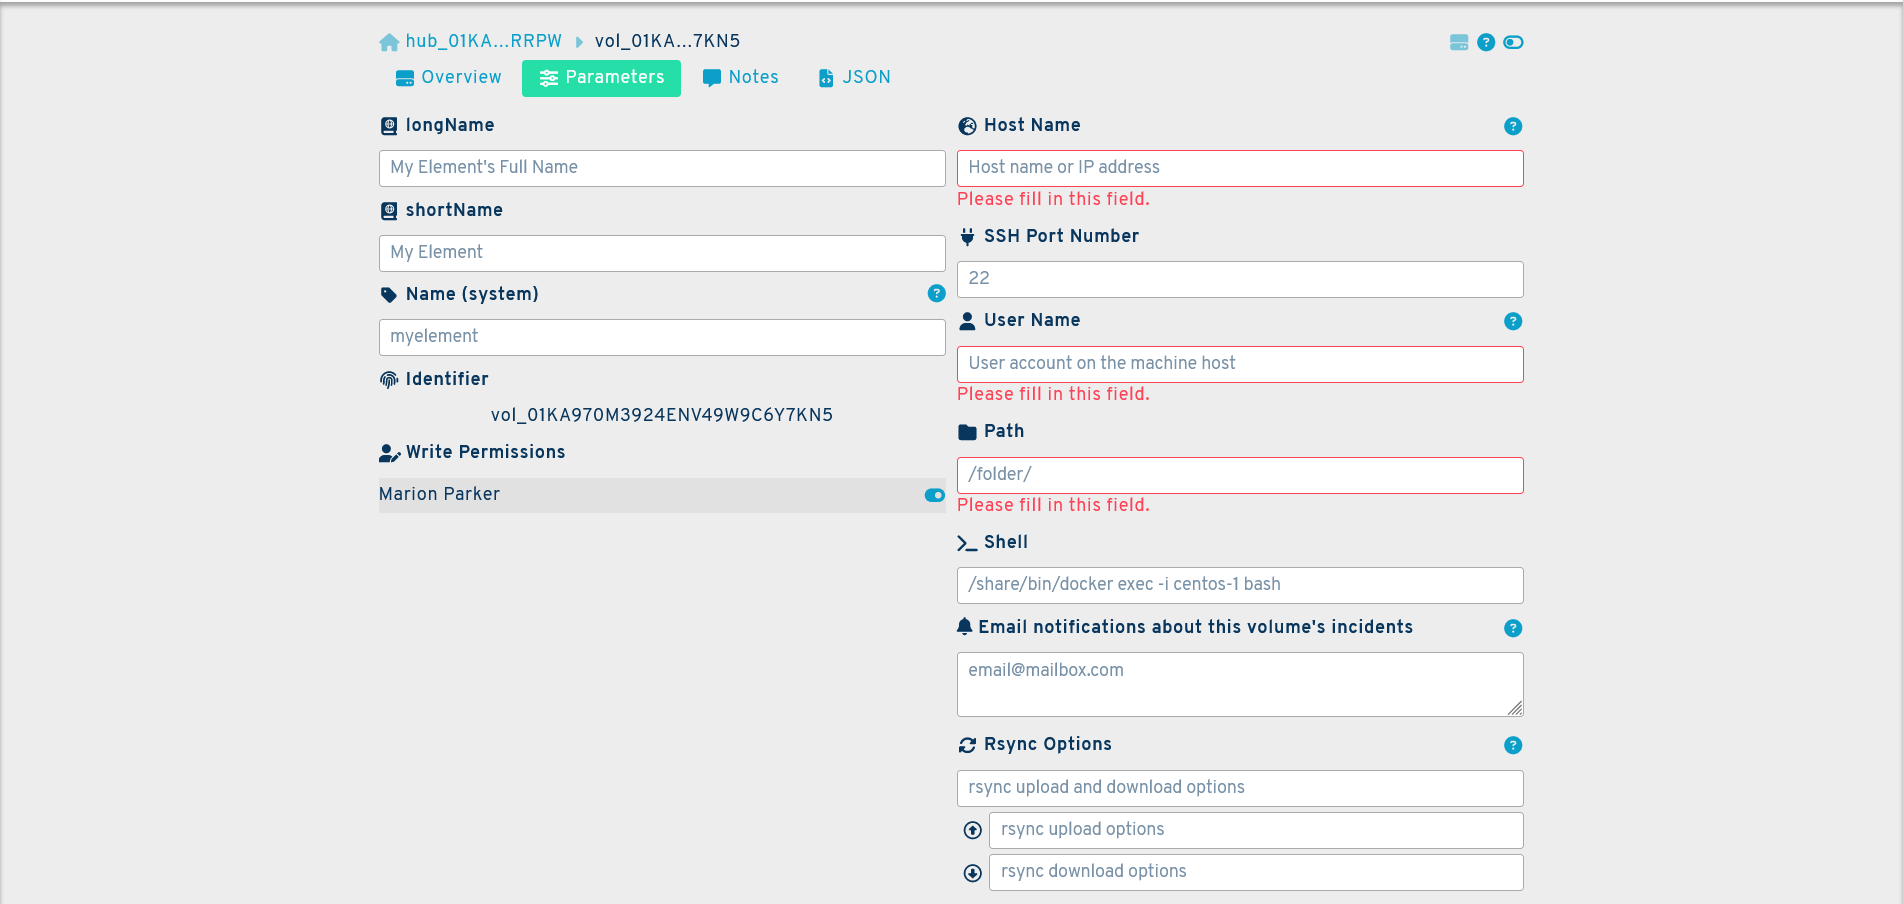
You will find that the storage page is similar to the one used for the hub. To configure your storage, go to the parameters panel and fill in the following fields:
longName: this is the full name of your storage. It may be anything you choose.
shortName: this is the truncated name of your storage, when using the full name is not practical.
Name (system): this is the name of your storage in the system. It can be made of between 3 to 16 lowercase alphanumerical characters and cannot contain spaces.
Host Name: the IP address of the machine running the storage.
SSH Port Number: the network port configured to access the storage using the SSH protocol. By default, this is port 22.
User Name: the name of the user account for SSH.
Path: the folder path where the files to be transferred are located. You must have a file named “.SyncPlanetVolumeRoot” in the volume's root folder to start file transfers. This allows the synchronization agents to verify that the folder is ready and mounted.
Shell: a command shell to use in place of the native shell. This is useful if the service is run inside a docker container. This field is optional. Using it is only recommended for experts.
Rsync Options: this will allow you to tailor the behavior of your storage to your needs via Rsync options. This field is optional. For a non-exhaustive list of options, please see: Rsync Options
Finally, you must install the hub's public SSH key under .ssh/authorized_keys in the user's home directory and create an empty file named .SyncPlanetVolumeRoot in the volume's root folder.
Note
The .SyncPlanetVolumeRoot file allows the synchronisation agents to verify that they are operating in the correct folder. This is essential to start the synchronisation process.
Note
No password is required thanks to the architecture of the network, which ensures a higher level of security than the use of simple passwords.
Your storage should now be configured and connected to the hub. This step will need to be repeated for each storage you wish to add.
You can find and manage your storages on the connections panel of your account. For more information regarding storages, please see: Storage
Additonal Questions
If you have any questions regarding the set-up process that are not answered by this guide, please contact us at support@syncplanet.io. In addition, some of our subscription plans include full support days.